Hosting a Website or Blog on Github pages
Festive holidays usually offer me an opportunity to execute some personal projects. This past Diwali weekend allowed me one such opportunity and I grabbed it to migrate my blog to Github Pages. This does pose a limitation of largely being able to host a static website only however, it serves the purpose of a blog quite well and most of the dynamic functions on a personal website or blog can be met easily with 3rd party service web integration.
Though its not the end-state yet and I am working on addressing some of my requirements for this blog however the MVP, as they call it, is published & its time, therefore, this post is about that experience and the technology under-the-hood.
Here is the overall publishing process you will experience along with the technology stack details.
Hosting
How you host this is the best part.
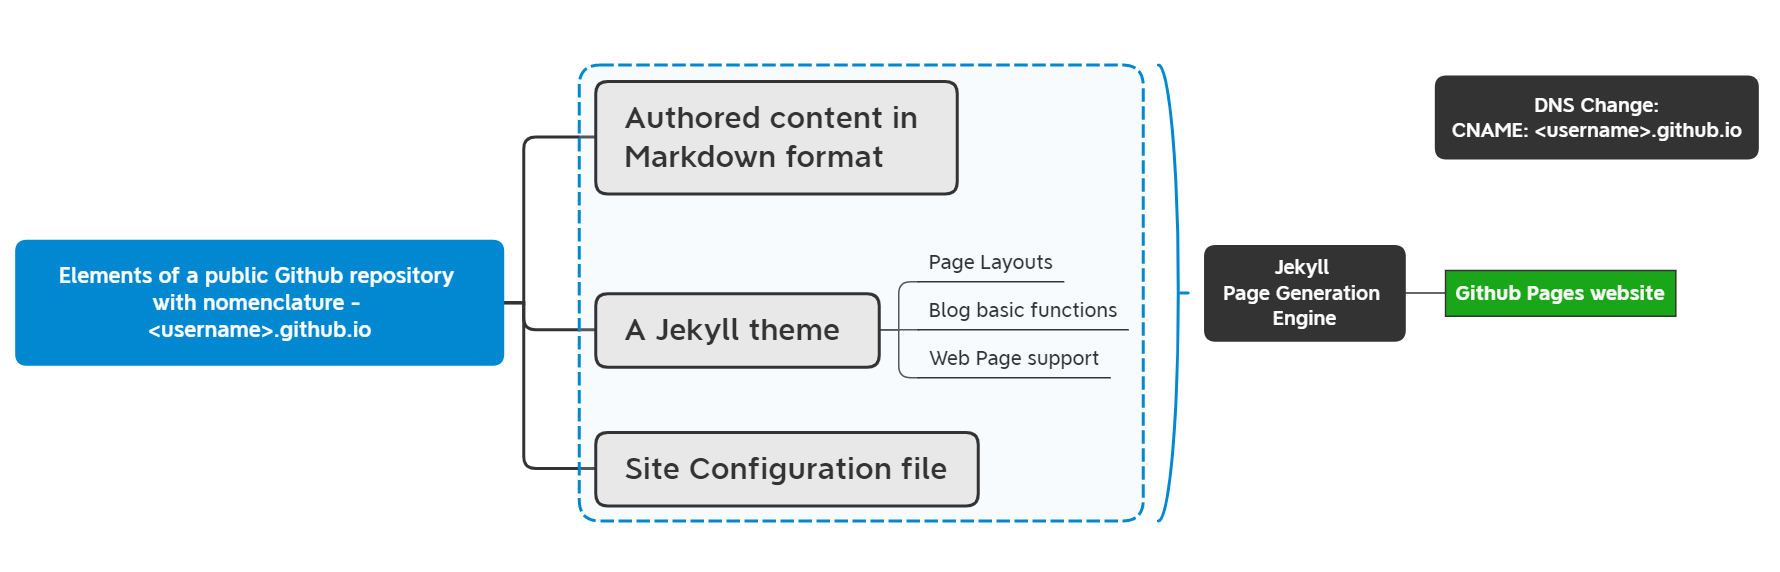
You host your content in a Git repository on Github.com. The web hosting is also provided by Github in form of user site powered by Github Pages. For a regular free Github user, this will need to be a public repository however, that should not matter as all of the content in the blog is anyways meant to be public, right?
The name of the repository needs to be in the format <username>.github.io for a repository to be recognized by Github as a repository for a user website. Any other name and you would have created a project repository and the Github pages url for such a website will not be at the root of its domain, by default. By default, the master branch acts as the primary source for the contents of the user website. In project site scenarios, its typically a docs folders or a gh-pages branch though you can choose to change it however you want.
Custom Domain
Its likely you would want to change the domain of this blog to a domain of your choosing. This can done by adding a CNAME entry for <username>.github.io agains the desired domain/sub-domain in the DNS records of your domain and specifying the desired domain in Custom Domain field in the repository Github Pages settings.
Site Generation & more
With the Github Pages hosting, you do not need a local environment to generate the site and simply pushing your content to the identified branch for Github will generate a new version of your website and publish it.
Jekyll is a site generation engine which is at the core of this solution translating your content in a repository to HTML format, providing you layouts for your blog posts & web pages and providing a range of features including basic blog features to this website. The set of features depends on the theme you choose for your website too and certain themes have a lot more features and others however, most of these themes extend the minima theme which provides basic recognition of a post and a page, a Home Page which allows for all the posts to be listed in reverse chronological order, specification of Author and Authoring dates on the posts and Google Analytics integration. It also ensures, with the help of a plugin already available in Github’s Jekyll instance, changing all in-site links from .md to their .html counterparts.
You will need to include a configuration file at the root of your repository _config.yaml in YAML format which needs to specify the Jekyll theme, title of the website and list of pages that need links in the navigation bar - be it on top or left of the page.
Authoring
As a blogger, you author your pages and post in Markdown format, certainly if you are looking to have a minimal-fuss experience. You could choose Asciidoc as well however, that will require additional plugins for Jekyll.
On the very top of every page or post file, you can include Front Matter to specify attributes of the content e.g. Page or Post Title, Author, Page Layout etc. This needs to be enclosed within the two sets of 3 hyphen lines as follows -
    ---
    title: Title of the page
    layout: page
    ---
For blog posts, the markdown files needs to be put in a _posts folders at the root of the repository and the fiel name needs to follow the nomenclature yyyy-MM-dd-title.md to communicate the title and authoring date to the Jekyll engine.
Be default Jekyll will look for index.md or alternatively, README.md and serve it as the Home Page of the website. For the Home Page or the page where you want the list of posts to appear e.g. a seperate Blog page, specify the layout in Front Matter as home instead of page.
You can author your content in a local environment after cloning the repository and push your commits back to the Github repository when they are ready for publishing. For multiple authors or publishing processes, the same can be driven by standard branching and pull request mechanism followed in code bases hosted on Git repositories.
Experience of migration from Wordpress to Github pages
My initial experience migrating from Wordpress to Github Pages was pretty smooth and involved the following steps -
- Creating a repository as described above
- Install a Jekyll export plugin to export my website content to Markdown format
- Fix the content structure to my needs
- Fix the links to be in-site absolute links to make it portable across domains and to make it site-structure aware, not repository structure
- Include and alter the page layout to include a quote from Dr. APJ Abdul Kalam
- Add a
_config.yamlto the repository- Include basic information including my Google Analytics ID
- Choose and specify the theme
- Add the header links to the config file
- Turn post excerpts
Onfor the Home Page
- Commit and push the changes to the
masterrepository of my website
Update
I subsequently realized I did not test the links to the posts that were posted in my social media posts. I did end up testing them to find them not working anymore. This happened because the URL to the posts changed slightly as it did not have the trailing slask (/) anymore. It was not feasible to update the links across all the social media posts therefore, I considered two alternatives - configure redirection rule OR let this be.
For now, I have let this be as it is and updated my 404 page to capture this information so visitors can remove the trailing slash and still visit the desired post however, I am considering scripting this within the 404 page.